Showing posts with label Hot Patterns. Show all posts

Sunday, October 23, 2011

Vogue 1135 Chado Ralph Rucci dress

 A beautiful dress designed by Ralph Rucci. Intriguing shaped tucks circle around the bodice, skirt and sleeves. Vogue calls this a "lined, A-line dress, fitted at bust, with all over shaped tucks, below elbow length kimono sleeves, gussets, side front slit and back zipper. Braided, self-fabric belt is attached along seam. Asymmetrical hand rolled hems". I see that it is now OOP after only 2 years. Too bad.


This comes in size AAX (4-10) and DD (12-18). I usually cut size 8 or 10 at the neckline, shoulders and sleeves, do a FBA and add extra for waist and hips. My measurements put me between 16 and 18 but I know that is way too big for me above the bust. This time, though, it looked tricky to do the usual FBA and even to add at the side seams because of the tucks, side panel and gussets. Just way too much fuss. The pattern front gives the actual garment measurements at the bust, waist and hips. I saw that the 16 would be a little bit bigger than I am so I cut that planning to do necessary shoulder alterations at the overarm seam. The necklines hardly varied from size to size so I didn't worry about that.

The instructions are very complete except for assumptions that a skilled sewer should be aware of, like trimming seams. Lots of couture techniques such as fusing interfacing over all seams, hand rolled hems, and lining. The side panel and gusset are the only really advanced parts and the instructions are very complete for that part of construction. I guess getting the tucks lined up across the seams and zipper is also a bit tricky. I found one small mistake at step 34 where they forget to mention stitching the facings after instructing you to pin them. They do show the seams stitched in the drawing so that is a no brainer.

I used a poly/rayon/lycra Ponte with a miniscule stripe from Joann's. The pattern calls for moderate stretch knits only such as wool jersey and matte jersey. I read that the original designer dress was made of interlock or double knit. I think that is a better choice than jersey because of all the seams. The stability of double knit made this a lot easier to get all those seams and tucks to be smooth.

I didn't want to use wool, although that would be beautiful, but I knew it would irritate my skin with such a high neckline. The pattern calls for lining (with stretch charmeuse or stretch Crepe de Chine) which would help with the skin sensitivity issue. However the neckline facing uses the fashion fabric. The lining is entirely optional as it is there only to hide all the interior construction. I left it off as I am very concerned about being too warm in this style.

I recurved the outer sleeve seam to make the shoulders narrower and I tapered the back zipper seam in an extra inch starting just below the neck down to below the waist. I shortened the dress 5 inches. Design changes: I left off the braided belt as I want to wear necklaces with this and felt it would be too busy with the belt. The seam under the belt was not sewn into a tuck so I went back and added that to the seam at the end when I decided not to use the belt. This necessitated undoing about 6 inches of the zipper application in the back so it would be better to decide to do this earlier in the game.

I notice in the photos that some of the pieces look darker in color as though I used the opposite side of the fabric or cut them facing a different direction. It puzzled me when I saw the photos. It is caused by the varied grain directions which reflect the light differently. I followed the grain lines carefully so that is just what happens. It isn't that noticeable in normal light.

The slit looks alarmingly high on the model in the photo on the pattern envelope. I stitched mine as indicated and you can see that, on a person of normal height, the slit is not that high on the thigh. My DH's initial reaction was that it looked to be a nun's gown. When he said that I decided to keep the slit.

As I didn't add the lining nor do the hand rolled hems nor make the braided belt this didn't take much longer than many dresses. Of course mine isn't quite couture but it is fine enough for me. Now to have some cool enough weather to wear it!

Monday, November 9, 2009

Hot Patterns 3 Graces Cross front top


I made the cross front version of this popular new Hot Patterns top. It is described as having a slightly cowled neckline and a cross-over wrapped front. I choose the extra-long sleeve that is designed to be scrunched.

Pattern Sizing: Sizes 6 thorugh 26 included in one envelope. I made a 10 as that cooresponded most closely with my hip and underbust measurements. My full bust is closer to size 14 but this design is quite generous through the bust so no FBA was needed.

Did it look like the photo/drawing on the pattern envelope once you were done sewing with it? Mine seems to be looser especially through the center front tummy area.

Were the instructions easy to follow? Uh.... no. The on-line video helps a lot but I don't think a pattern should be dependent on that source. Even with the video this top is confusing to get the criss cross right. I'm not sure that I don't have an extra twist in there.

What did you particularly like or dislike about the pattern? Love the drapey style. Don't like the excess of fabric in front

Fabric Used: Rayon jersey.

Pattern alterations or any design changes you made:None.

Would you sew it again? Would you recommend it to others? I probably won't make this style again but I plan to try the looped front version. If you like something a little different try it.

Conclusion: I like this okay although it seems a lot of fabric on my front. The back fits well. The rayon jersey is super comfortable to wear. Here is a view of the top in in action.

Friday, September 18, 2009

Off again

I have 3 garments ready to review but due to extreme busy-ness my photographer hasn't been available for the necessary shoots. I kept hoping a moment would open up but now we are leaving for a 3 week trip to Jordan and Israel (part of the cause of the busy-ness) so I won't be able to get to it for a while. Here's a teaser: Sewing Workshop Bells & Whistles.... I made the Bells shirt out of a cool shibori dyed cotton, Sandra Betzina V1101 sweetheart neckline dress from a colorful graphic cotton sateen (not sure I like this one on me) and Hot Patterns Classix Nouveau 3 Graces T Shirt ( the cross front one).

Last minute packing and we're off today.

Thursday, April 16, 2009

Hot Patterns Riviera Tee Shirt


I made two views from this pattern and like them both very much. The bright green was to be a test for fit because I thought the fabric too bright for me. However it grew on me so I finished the sleeves which really add appeal to the top. I want to make this one again. Here's the review: http://sewing.patternreview.com/cgi-bin/readreview.pl?readreview=1&reviewnum=38228. The second top was the one I really wanted to make but because of all the pieces it was hard to tell how it would fit, thus the trial bright green one. This one takes quite a bit of time to construct because each seam is sewn three times.... wrong sides together, overlocked, and finally stitch down flat. I didn't think I liked boat necks on me before this but my thinking is changing on that. Here's the review for the second top: http://sewing.patternreview.com/cgi-bin/readreview.pl?readreview=1&reviewnum=38230

Wednesday, May 2, 2007

PR: Hot Patterns Butterfly Top/Cape

Posted on:5/2/07 3:18 PM
Pattern Size:Regular
Project Photo:photo
Pattern Photo: HotPatterns Pattern Information

Pattern Information provided by Ann Smith

Pattern Rating:Easy to sew


Pattern Description: Here is the Butterfly Top with the cape collar from the Hot Patterns new collection of No Sweat Easy Sew garments. Like the other top I reviewed this is designed for drapey T-shirting or silky jersey. This tie-neck top has a cape layer over a gently shaped bodice with cap sleeves and a toe at the deep V-neck. I don't know what that means "a toe at the deep V-neck"? Do you? The front drape is stitched into the band at the bottom. Maybe that is the "toe". Like the cowl top, this has a hip band and pulls on over the head. Here's the back.

Pattern Sizing: Sizes 6 through 26 in one envelope. I cut the 8 at the top and 10 at the sides. However when I tried it on I decided to down to the 8 at the sides as well. It runs very large.
Did it look like the photo/drawing on the pattern envelope once you were done sewing with it? Yes

Were the instructions easy to follow? Instructions are good except they forgot to mention finishing the back neck. I turned the raw edge under and top-stitched.

This top is a wee bit trickier than the cowl neck top due to the neckline/cape construction. If you follow the instructions to the letter it works out correctly but it could be a little puzzling.

What did you particularly like or dislike about the pattern? I love the unusual, retro character of the cape collar and tie-neck. I feel it is very flattering and graceful. It drapes very well in my fabric. I love the neckline which is not too low on me and the tie at the neck. However the one thing I'm not happy about is the fact that my fabric doesn't look good on the reverse and it tends to show. Since the cape is a single layer it flips out easily. Also, although I understitched at the neckline it wants to roll out and show the underside of the fabric. There really isn't any place to tack it to prevent this. Perhaps I should topstitch it. This complaint is just about my fabric, not the pattern.

Fabric Used: Rayon jersey animal print, well aged in my stash.

Pattern Alterations or any design changes you made: I changed the edge finish from a turned under, top-stitched hem to a 3 thread overcast. Very easy and quick on that long cape edge.

Would you sew it again? Would you recommend it to others? I like this alot and would sew it again someday. It is very distinctive so maybe not for a while. Definitely recommend it to you.

Conclusion As others have mentioned the sizing is large on this top. Also I didn't have any trouble with the band stretching out at the bottom. The top eased into it nicely and it fits well (with the smaller size).

Hot Patterns No Sweat Easy Sew Butterfly Top/Cowl


I made the cowl neck Butterfly top from a pink paisley onionskin in my stash. This was purchased from EmmaOneSock of course. The top goes together very easily. I cut an 8 at the top and 10 on the sides as several reviewers on PR mentioned that it ran large. I'm not really crazy about how it looks on me.... too much fabric on the front and perhaps the color/print looks a little matronly. I tried to jazz it up by wearing trendy crop pants and funky shoes.
click for larger image

Tuesday, April 24, 2007

Hot Patterns Bo-Ho Deluxe Flower Power Coat

1/26/06 2:31 AM
Last Updated:1/26/06 2:35 AM
Pattern Size:Regular
Project Photo:photo
Pattern Rating:Would NOT recommend

I thought this would be a quick little project.... a fun coat to throw over the Patchouli dress as shown under it on the pattern cover. Boy, was I wrong!!!

Pattern Description: From the pattern cover: "Super-luxe but easy to make statement coat. Coat has raglan bracelet length sleeves, bust darts, center back seam and slit. Coat has center front and neckline facings and features optional lining and floral appliques." I guess if you don't do the lining this could be considered easy to make. There is not much to it. However since the instructions are a bit vague and important notches are missing it might not be that easy for a beginner. If you choose to do the lining as I did, major problems follow. There is no further reference any where in the pattern to the floral appliques. I thought there might be a design included from the way it is described on the cover.

Pattern Sizing: I used the slinky girl size 12. I started to cut size 10 which is my usual and corresponds more closely to my measurements but a muslin showed a bit of tightness across the upper back. I went up to the 12 and dropped the bust dart as usual. This sizing worked out fine.

Did it look like the photo/drawing on the pattern envelope once you were done sewing with it? As you can see in my photo I made many changes. These were all done after completion in an attempt to make it wearable. I thought my interesting fabric would be enough to carry the simple design but it looked really drab and shapeless when done. I had not put in the optional darts as I feared it would be too snug over the dress. However it really needed the shaping in the waist so I added tucks on the outside. I also added the sash to pull it in more and to add some oomph. Also note that the picture on the pattern cover shows set in sleeves for some reason. The line drawing is accurate with the raglan sleeves. Here is the back.

Were the instructions easy to follow? The instructions were unacceptable for the lining construction. I have put in many linings on coats, jackets, what have you. I've never seen one like this. I consulted 15 - 20 sewing books, including couture books, and found nothing similar to help me. The main problem area is dealing with the facing and lining at the top of the back slit. I could not figure it out. There is no reference to this spot in the instructions. I emailed Trudy for help. She responded by calling me a few days later saying that she started to write me an email explaining how to do it but decided to send me a mini-mockup of paper, sort of an origami thing. She said she knew I would understand the procedure just by looking at this mock up. My question: if something cannot be explained with words and no pictures are included, why is it in the pattern? Next question: why did this mini-mock up that she said she was sending never arrive. I waited 9 days and decided to try to finish it whatever way I could. I called Trudy to say her explanation never arrived. She was puzzled by this but also told me that she had looked at the pattern after I had drawn her attention to it and discovered that she had decided against this detail, removed the instructions, but had accidentally left it in the pattern. Thus I had cut the pattern but had no clue how to do it. There is no mention in the instructions of anything relating to handling the top of the back slit. I improvised, using some creative hand stitching to make it work. I have no idea if my solution is anything like the original plan.

What did you particularly like or dislike about the pattern? I have to say, in 50 years of sewing, I can't remember ever being as angry with a pattern as I have been with this one. I spent so long on it, and much of that time could have been eliminated with a few lines in the instructions. For example, the back lining piece appeared to be much wider at the lower edge than it should be. It turns out that it, and the lower edge of the sleeve lining, need to be gathered (not just eased) onto the facing. A simple sentence in the instructions stating this - gather the lower edge of the lining pieces - would have saved me several hours of thinking, sewing, ripping, etc.

Notches are mentioned in the instructions but do not exist on the pattern. These would have really helped especially in that back slit area. Also some of the pattern pieces are similar in shape but with no notches or markings of any kind it is easy to confuse the pieces or put them on upside down. I did that several times. The upper back lining has a nice, generous pleat.
The skills list says you need to be able to 1) understitch and staystitch a seam, 2) prepare and apply hem and cuff facings, and 3) prepare and insert lining (optional).
I would add that you need to have experience bagging a lining or very good instructions for doing so. This was quite tricky, even beyond the other issues I already mentioned. Also you need to know how to prepare a corner for slashing and pivoting. This technique is used several times.

Fabric Used: I used a crinkly silky, probably polyester, from EOS. Because it is lighter than the fabrics suggested for the pattern, I thought it a good idea to line it. I choose a heavier crepe back satin for the lining.

Pattern Alterations or any design changes you made: When I was done I realized that the coat was too short to cover the top of the ruffle on the dress. This was because my dress had stretched from the weight of the knit. I decided to add the ruffle at the bottom to help this situation. I liked it so much that I added it to the sleeves also which had the added advantage of helping keep the facing from creeping out.

Would you sew it again? Would you recommend it to others? I will not sew it again nor would I recommend it to others. I think if you want a simple coat there are better patterns out there. On the plus side I had no trouble with the fit or shaping at the shoulders which sometimes is a problem with raglan sleeves. Trudy told me that the problem with the back facing will be corrected on the next printing of the pattern.

Conclusion This was one of those crazy projects that took untold hours and resulted in a strange garment that I may never find the right occasion to wear. I wanted it to go over the Patchouli dress but I don't think I like it together. Perhaps over pants is better. I hope that Hot Patterns will continue with their creative, to-the-minute designs but add notches and other markings. And carefully edit the instructions to be sure they are accurate. I will be buying more even though this one was so trying.

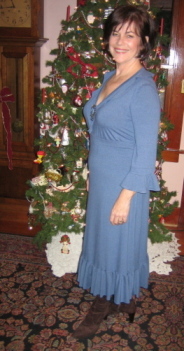
Hot Patterns Patchoulli Dress blue rayon jersey

1/9/06 2:12 AM
Last Updated:1/9/06 2:16 AM
Pattern Size:Regular
Project Photo:photo
Pattern Photo:

Pattern Information provided by Ann Smith

Pattern Rating:I Highly recommend this pattern

Pattern Description: I'm happy to be reviewing my first Hot Pattern design. I'm quite pleased with the outcome. This is the Boo-deluxe Patchouli dress described as "demure but ultra-glamorous". It is semi-fitted with sightly raised waistline, gathers under bust at front and back, V neckline with self bound edge and ruffle. The dress has flared 3/4 length sleeves with band and ruffle and a 4 gore below-knee length skirt with a self fabric ruffle.

Pattern Sizing: I used the Slinky Girl size 12

Did it look like the photo/drawing on the pattern envelope once you were done sewing with it? I think so. The slightly raised waistline doesn't look as raised as it should. I think the 4 way stretch of my jersey has allowed the waistline to drop a bit beyond my alteration. Here's a look at the back.

Were the instructions easy to follow? For the most part this is an easy project and the instructions were okay. Other reviewers have mentioned omissions and these are indeed true. In addition I found the instructions erratic... thorough description of one thing and nothing about other things.

Those of you that have looked at this line of patterns know that there is a list of skills needed at the top of the instruction page. On this pattern it is suggested that one needs to be able to 1) Under-stitch and stay-stitch a seam. This is never mentioned specifically during the steps of construction. I guess you need to know when to do it as well as how to do it. 2) Prepare & apply a fluted neckline & sleeve trim. I'm not sure just what this means but I did have trouble with the neck binding. The instructions start with a good description of applying the binding but stop short of the tricky part. If you follow their way, which I did, you start at center front with the binding and bring it around the neckline to meet at the center. Doing this results in 6 layers of fabric that are seamed at an angle, creating 12 layers. I really struggled with this and even after trimming out as much of the bulk as possible it still looks lumpy. Also I had to hand stitch the seam as I couldn't figure any other way to do the seam. I'm not happy with the final look of it but can hide it with a strategically placed pin. This was the only part of the construction that was not easy. 3) Gather & apply a ruffle. Not much trouble here except for the length of the skirt ruffle. I haven't done that much gathering since we made dirndl skirts in 8th grade. 4) Insert a centered side seam zipper. I skipped this as my knit fabric allowed me to slip the dress over my head.

What did you particularly like or dislike about the pattern? I love the style. I wasn't sure if I would like the ruffles on me but I'm quite pleased with the look. My husband loves it.

Fabric Used: A wonderful rayon jersey from EmmaOneSock.

Pattern Alterations or any design changes you made: I did my usual FBA and lowering of the bust line. I shortened the sleeves 1 1/2 inch which is also usual for me. I didn't shorten the skirt length at all as I thought it looked more flattering with the extra length. So, since I am 5' 3" it is longer than intended.

Would you sew it again? Would you recommend it to others? I definitely recommend this. I had no trouble with the sizing. Although the instructions are spotty in places they work for the most part.

Conclusion I'm very pleased with my new dress. It is incredibly comfortable partly due to the lovely soft fabric but also the relaxed fit of the styling. It will be simple to alter the dress when I lose the 5 pounds gained between Thanksgiving and Christmas (think positively) as the sleeve, bodice, and skirt side seams are sewn last.