Friday, May 16, 2014

Sorry I disappeared. I have been sewing in my wonderful new space but haven't been able to get back into the reviewing or blogging mode. I have 20 or 30 projects done in the last few months with no record. Shame on me.

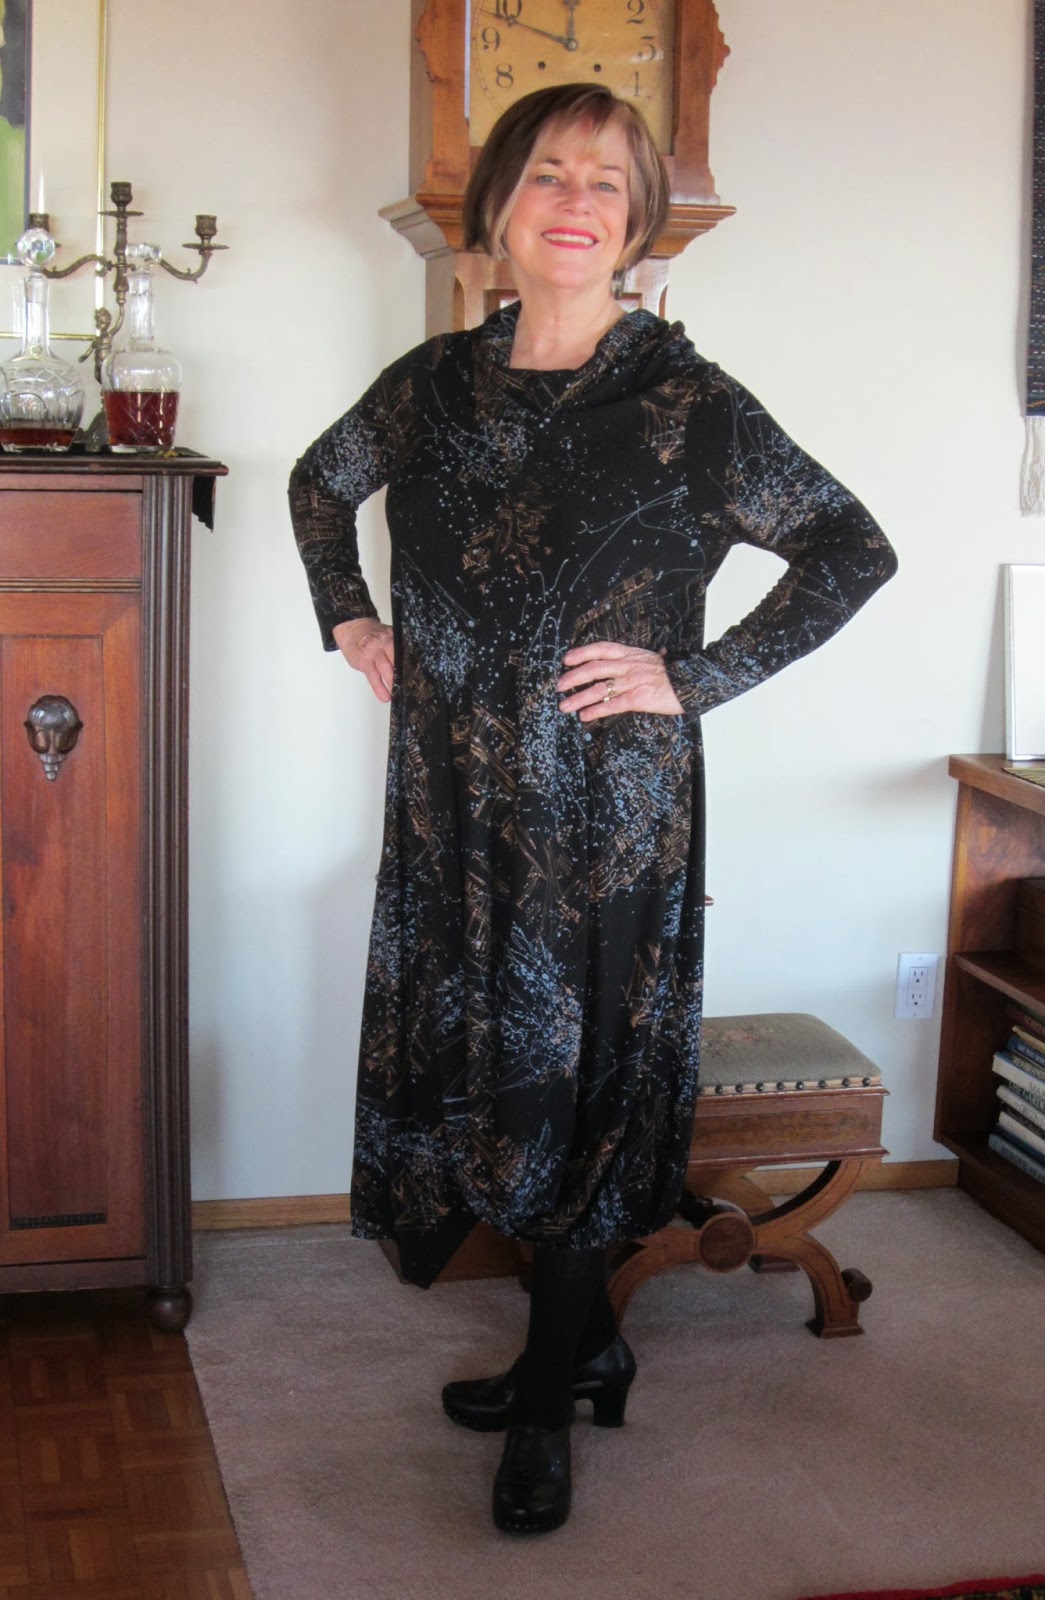
But I must tell you about this project.  I know you all think this dress is a giant muumuu so why bother with it. Even if you don't like very over sized full dresses this pattern has some wonderful elements that make it worth buying. To me, the appliqué and sleeves are delightful details that make the pattern a must have. The appliqué is done by stitching continuous bias to the dress on top of a piece (the stripe) already applied to the dress. Then yarn is couched on top of the bias with a zigzag stitch.

The envelope description is "oversized, pullover dress has side front welt pockets, sleeves bands, tie ends forming drape, wrong side may show, appliqué , trim, decorative stitching, topstitching, and stitched hems". 
I measure size 16 or 18. I cut size 10 and took 2 inches out of each side seam for an 8 inch reduction around. It is still huge. 
The pattern photo doesn't highlight the contrast much as they used very close colors. There are 3 different fabrics plus yarn used in this.
I used a medium weight linen for the main fabric, light weight for sleeves and appliqué , and a rayon crinkle for the second contrast (under the appliqué ). All of these, even the yarn trim, were in my stash. The light linen and rayon were remnants. This design uses a lot of fabric so it was nice to find everything I needed on my shelves. I didn't have enough fabric to cut the pockets so they aren't there. I didn't shorten the length at all so you can see that if you are taller than me (5'3") you might want to lengthen it.
Koos gives us lots to enjoy in this pattern.
 I hope to use the sleeves and embellishment technique again. I might even make the whole dress in a more drapey fabric for a very different look.

Thursday, January 23, 2014

I made a couple of little dresses for my 3 year old granddaughter while organizing my new sewing studio. These were quick and easy and helped ease me back into this world. I found these patterns on-line from an independent, My Childhood Treasures, that I hadn't heard of before but somehow it showed up when I was doing a search for little dresses. I down-loaded them, found fabric in my newly organized stash and whipped them out in no time. I don't see any reviews of this line on Pattern Review yet.

The first is called the Elke Dress. I used a purple (her favorite color) cotton interlock to sew it up. There is a large collar and bow at the shoulder for pizazz as well as flared sleeves with a deep ruffle.

The second dress is the Bluebell Dress. For this I found a red rayon ponte in the stash. This was a pricey piece that I had purchased for a dress for me but found it too bright when it arrived a few years ago. Not too bright for a 3 year old I thought. She loves this dress and wore it at Christmas to my delight. The hood looks a bit wonky when worn up but very cute otherwise.

For sizing the chest measurement is used. If I had used that as my guideline she should have needed size 1! I chose size 4 which was a wee bit large but a small amount of taking in at the sides made it work. This pattern company has wonderful photographed illustrations that are very thorough. They really walk you through every step. Since they are pretty simple to start with, I think a beginner could do these dresses.


Thursday, January 16, 2014

I had a request for more pictures of my new sewing studio. I lowered the blinds so the bright light from the western view didn't make it so hard to see inside the room. Just to tease I added a few more view photos. We have been having spectacular sunsets lately.
Goldern Gate

Gorgeous colors over the Golden Gate
Mt. Tamalpais


There is so much light in this room during the day that I don't need artificial lighting at all.

Another window with view of Mt. Tamalpais

The sewing corner
The computer area. It was a dressing area with the sink in its former life.
I think I will remove the sink to have more desk space beside the computer.


What an amazing design. How did Katherine ever figure it out?? From the envelope: Very loose fitting, pullover dress has right and left sides extending into collar and drape, no side seams, and partially elasticized hemline. Right and left sides are cut on crosswise grain. I made size 12 although my bust measurement calls for size 18. Plenty of room.
The instructions are very good. It is important to mark all dots and notches clearly on your fabric with each reference letter. This sews up very quickly but it is so unusual you must keep the instructions close at hand. I love the unusual design with only 2 main pattern pieces, and no side seams or shoulder seams. There is a slight pulling at the upper arm which I think is due to the lack of shoulder seams.

I used a cotton/lycra blend. You definitely need the 2 way stretch as the entire garment is cut on the cross grain. I thought my print was just squiggles until I laid it out on the table and discovered the lines were actually buildings. They are all sideways now because I decided to go ahead with this pattern. The buildings look fine sideways.

I shortened the dress and the sleeves 2 inches, a usual thing I do. You need to study the design to figure out where to shorten. It is the line where you add the elastic. Also, the only place to make it larger or smaller is at the center front seam as there are no side seams. I initially added there but took it out easily when I saw it was unnecessary.

I really like this dress and definitely plan to make it again. I love the stripe version and will do that if I find a suitable fabric.

Tuesday, January 14, 2014

I'm back finally after a year and a half! What has happened to me? The usual trips out of the country and to Jackson Hole to visit and also surgery for me. These things wouldn't have stopped my sewing but the big event did. After 43 years in Modesto, 32 in our farmhouse, we decided to move. We wanted to be closer to our Bay Area kids, closer to the airport, and our acre of high maintenance landscaping was just too much. So after looking at over 200 houses in person, probably 1000 on line, 11 offers (the Bay Area real estate market is insane) we finally got lucky and bought our dream house. During all this time I was spending every spare moment trying to get rid of things. 8 garage sales, dozens of trips to the donation spots, giving away and selling took lots of time. In June we closed on our new house and then started the big push to sell our old house and to pack umpteen million things.

I was a collector for many, many years. I counted over 350 framed items hanging on the walls and about 100 decorative plates. Collections everywhere plus of course all the clothing and fabric stash. Although I got rid of lots, there was still much to move. One giant and one regular moving van loaded up at the end of August and we had it all hauled over here. Now I had walls of boxes and much less storage space. Everyday unpacking, and more hauling away.

Not much sewing during this long time except a few isolated projects for my granddaughter. But NOW I am ready to sew again.  I can finally feel like a human. My wonderful new sewing room is set up and a delight to be in. Don't be mad, here is the view from the sewing room. Hard to see because of the back lighting but in the view are the bay bridge, downtown San Francisco, and Golden Gate Bridge. Heaven! I can have my cutting board set up and ready to use all the time. Plus Yvette (in the red robe and hat) loves it too.


p.s. I guess I will have to change the photo at the top of my blog....

Tuesday, June 12, 2012

Snowy Mountains Quilt

While on my recent visit to Jackson Hole I finished up the quilt I have been working on there. As it is such a gorgeous area with beautiful mountains, trees, and wildlife I wanted to make a wall hanging that represented that beauty. When I found this design I knew it was just what I wanted. An interesting project to create but not hard or terribly time consuming. At about 52 inches wide it is large enough to make a statement and will go up on the wall in the stairwell.  I enjoyed picking out the fabrics most of which I had to buy as I don't have much of a stash of quilting cottons. But I was delighted to use a remnant from our first grandchild's nursery decor which became the blue sky with stars in this wall hanging. By the time I finished it and found a hanging rod we didn't have time to get it up on the wall. Next visit, top priority.

Thursday, May 31, 2012

Surprise!

What a fun thing happened yesterday. My friend Barbara and I went to SF to see the Jean Paul Gaultier exhibit at the De Young Museum. Just as we were starting to go in the exhibit Barbara spotted a familiar face across the lobby space. "Isn't that lady over there with the big glasses the one who posts on Pattern Review"? I glanced over to the bench that she was looking at to see Margy, Jillian, and Shams all sitting there in a row. At about that moment they spotted us and great exclamations of amazement and glee ensued. I'm sure the other people in the vicinity were quite startled by our loudness. We had a great chat there in the lobby. They had already seen the exhibit and described to us how incredible it was. Eventually we went on in to see it. Jillian has put up some great photos on her blog showing highlights of the show and our meet up. Later on Barbara and I met Jillian again at the other art museum in SF to see the "Cult of Beauty" show which is focused on the Aesthetic movement. Two great exhibits, an unexpected meet up of fellow sewists, and a brief stop at Fabrix. A perfect day.

Often I forget to post here about my reviews on PatternReview. Here are the links to my most recent reviews: McCalls 6556 dress and Vogue 1274 Mizono shirt. Sorry I don't have time now to write more about them as I am supposed to be packing. We leave in the morning for a trip to Jackson Hole once again. Jilly suggested I write on my blog first and PR afterward. What a good idea. Maybe that way I won't forget to share here.

As soon as I get back from Jackson I will be in a frenzy to get ready for my club's annual sewing retreat at Lake Tahoe. I have already cut 6 or 7 projects but I really need 12 or more. Last year I sewed up 15 garments. I become a sewing maniac there doing nothing but sewing, pausing briefly to wolf down meals. The first year we went Barbara and I took our hiking shoes. LOL. Never put them on.


Monday, May 21, 2012

Vogue 1309 Miyake Tunic


Where do I start with this?? Many of us loved this striking design and ordered it immediately when it appeared. I do love Miyake and always buy those patterns whether I like them or not. This one looks so great. Let me tell you this is the most befuddling Miyake I have made and I have made many. You don't need to spend much time sewing but lots of time puzzling. And perhaps ripping because you did something wrong or, in my case, think you did something wrong. Rip out and sew back the same way. I fear I may get confused just putting this on and off. It is very easy to get all twisted around.

There are 4 pattern pieces, all rectangles. The very big main piece is a long rectangle that you slash down the middle for much of its length. The slashed edges become the outer edges at the shoulders. This slashed edge is to be bound with bias binding that you make (that is the 4th pattern piece). I don't get why you carefully bind that edge but none of the others. At places the bound edge and unbound edge are sewn together. No mention of finishing the unbound edges. And the bound edges don't really show on the outside.

Careful marking is essential. Be sure to use something that won't fall off or disappear. You really need all those marks, circles, dots and especially the letters. I didn't even see the letters at first as they are very small on the pattern. Also, mark left and right shoulder on the outside. I contemplated leaving the marks on permanently so I would remember which way to put it on!

I couldn't figure out just how to alter to add at the bust so I did a muslin (very rare for me) using the largest size in my envelope which is a 14. I really need 16 or 18 for the bust but never buy that because it is way too big in the upper chest and neck. Maybe it doesn't matter here because those areas are folded under. I discovered that the sizing is entirely controlled by the width of the large rectangle and the width of the smaller underarm rectangles. You can make this wider at necessary but then it may be too big at the hip. Or you could change the shape of the underarm part to accommodate where you need it which is what I did. 

This looks so great in the photos. My knit version looks quite different of course because it drapes like a knit. Done in the suggested fabrics, dupioni, paper taffeta or broadcloth, it will look more like the photo. Be warned though, that it may be uncomfortable and unflattering if the fabric poufs out a lot (as on my muslin).

Here are photos of my muslin. You can see the design lines better here than on the knit. The pink ribbon was just added to extend for fit. Side front, Back, Right side Front

My underarm pieces sagged a lot. I think they stretched while sewing across the top. In a woven this might not happen. I almost left it as a design element but then I realized I could just tuck out the excess since a few more folds would not matter in this design. 

Also be aware that not only is this pretty low cut in center front, butunder the arms it is low and very wide. Your bra may show in theback, front and sides. Note I am wearing a camisole..... essential. Also note that part at the hip in the photo that juts out. That really does jut out. It isn't just the way the model is standing.

You can see that it is really long. I shortened mine 2 inches for my height and may take off another one or two.

The instructions are okay but this is a hard one to explain. One important point is left off and that involves how to keep it from getting twisted and turned half inside out or other weird ways. It helped to drape it on the dress form at times.

I made my muslin and attempted to wear it. I did get it on but it felt like a straight jacket. I didn't notice until my second attempt to sew this that the seam allowances are 1/4". This is not mentioned in the instructions as it should be. It is only in small print in a few places on the pattern pieces.

For trial I used a homespun cotton. After that trial I realized it would be too uncomfortable for me to wear even if it were looser. Also I didn't like the idea of trying to zip a separating zipper on my back. Painful contortions. So I chose to use a rayon jersey. It is very comfortable and no zipper needed. Of course that applied zipper is a very current look and does look cool. 

As mentioned I left off the zipper, I changed to a knit, I widened the underarm pieces. I serged the edges that are meant to be bound. It helps to finish that edge and not the others because it helps you keep straight what you are doing. However, that leads to the aforementioned issue of some edges being finished and others not. I didn't hem this knit.

At first I wrote on Pattern Review that I'm not that happy with this and listed it as Do Not Recommend. However in the knit I find it comfortable and interesting and changed my mind to Recommend with Modifications. I may even make it again now that I really have figured it out. 

Maybe this will work for you. Perhaps if you don't need the FBA or added on for hips it will be right. You know, a more rectangular figure. 

All this said, it is a very interesting design based, as many Miyakes are, on basic geometric shapes. If you like a puzzle this is a fascinating one. See the open drape across the back.

Saturday, May 19, 2012

Cut-Up Couture by Koko Yamese


Sculptural Dress with Deep Collar


Tunic

Balloon Top
Blouse with Buttoned Shoulders
Draped Blouse
I ordered the book, Cut-Up Couture by Koko Yamase, from Amazon without having seen it in person at all. I just loved the concept and the photos of projects on the cover. When it arrived I jumped on it right away and started plotting. Most garments are made with Large or XLarge sweatshirts or tee shirts. I thought my DH had some but he couldn't or wouldn't come up with any to spare. I sleuthed around and found a web-site, Cheapestees.com, that sells such things cheap. I ordered a bunch which arrived quickly. 

You use one, two or three sweatshirts, cut them according to the easy to understand instructions and illustrations, sew for a few minutes, and, voila.... you have something else. Talk about re-purposing! These are fun, fun, to make. The Draped Blouse (using one men's XL sweatshirt) took me 20 minutes to make, including the cutting. The Tunic, using 2 red short sleeve T-shirts and velvet ribbon took a little bit longer. The Balloon Top uses one men's Large sweatshirt and satin ribbon. It was a bit more confusing to construct but still quick. 

My favorite is the Sculptural Dress with Deep Collar made from one Large and one XL men's sweatshirt. My DH thinks I look like an elf in this.

I also made the Blouse with Buttoned Shoulders which uses 3 long sleeve Men's Large sweatshirts. This took the longest to construct because of the 10 buttonholes. Now I have to figure out what to do with the top half of 3 large sweatshirts. It can be worn 4 or 5 different ways including a skirt and harem pants (not to be photographed on me) depending how you button it.

I also tried the Inside-Out Blouse from T-Shirt. It was thrown away within 15 minutes. Ugly on me. Maybe good on you.

For fun, easy, youthful projects try this book. There are also designs using men's dress shirts and neckties. Cute also.

Monday, April 16, 2012

KwikSew 3921 Toddler's Dress

An adorable toddler's dress pattern from Kwik Sew. However, it is not a kwik sew! What with bias binding, set in sleeves, back zipper, gathering, loops and buttons, and 4 different fabrics, it takes a while to create. I think well worth it though.

Kwik Sew describes it as "dresses with lapped front bodice, waist inset, gathered skirt with contrast panels, center back zipper, and neckline and bottom edge are finished with bias cut bondings. View A has decorative loops and buttons, and full length sleeves with contrast cuffs. View B has short sleeves finished with bias cut bindings and decorative ribbon trim at waist". I made View A but in retrospect I think I should have left off the buttons and loops on a garment for a two year old. They are decorative, not functional, but she has not ever had a button on a garment and is way too interested in them. I hope she doesn't pull one off and swallow it. Yikes! Bad grandma.

I made this for her second birthday. She is tall for her age and her measurements were bigger than called for size 2. So I made size 3. As you can see, right now it is way too big for her. I guess better too big than too small.

The instructions are good
 for the most part. I would not recommend sewing a tiny tube and trying to turn it for the loops. I started with that approach and it was just about impossible to turn. I cut a new strip and folded it in and top-stitched it. Much, much faster and easier. 

I used quilting cottons all from my stash and I used an invisible zip because that is what I had on hand.


I hope to make this again, next time in brighter colors. She wore it out to a cafe on her birthday and received many compliments as she pranced around, dancing and lying on the floor.

Sunday, March 18, 2012

Vogue 1618 Issey Miyake

I finally made this Issey Miyake pattern from 1985. Sometimes it takes me a while to get around to a project! I've been thinking about this one lately because it seems to be on trend now. Miyake designs were never about trends but classic in their on unique way. Even so, for some years this style seemed too loose and too drapey. Now I feel comfortable with that silhouette once again so I brought out the pattern, found fabric in my stash and plunged in. As often the case, it was hard to find a second fabric to work with the first. Once I settled on black it wasn't hard to find that in my stash too.

Here's the envelope description: "Very loose fitting, pullover top with right front drape extending to side with strap, back diagonal seams, concealed cap sleeve on the right side, and wrist length sleeves. View A has a slouchy collar. Straight skirt above ankle, or straight legged pants with elastic waist and mock hem bands. The skirt has a shaped hemline and the wrong side shows". Although it is described as ankle length, you can see that the short side is knee length. The skirt is one piece wrapped around at an angle.


As this is an older pattern, there is only one size per envelope. My pattern is size 14. I folded out 2 inches of width on the top as I usually cut a 10 at the shoulders. It is still very over-sized. The skirt fit as a normal size 14 would.


Miyake is so original, there are usually spots that are counterintuitive and instructions are tricky. Fortunately the only spot that was like this on this design had a very good sketch. Sometimes words are not sufficient.

I love the draped front and odd strap across. Maybe I would have liked to make the top a wee bit narrower. Love the angled skirt. There is no way to make the short part of the skirt longer without the long part also being longer. I shortened the skirt so it wouldn't hit the floor but that brought up the short part to above the knee.

I used a wool gauze stripe and black ribbed cotton knit. On the top the gauze is attached to the black knit although it looks to be a separate draped garment. This is definitely a fun and funky Miyake ensemble that I will enjoy wearing.